Application developers who are working in Java, using the JMS interface, often choose to work with the Spring Framework. Spring can simplify the coding of new applications by providing templates for common patterns, and has been successfully used for many
years with the MQ JMS classes. The JmsTemplate class in Spring is the key interface here, but it still relies on having dependencies and configurations defined or coded.
The Spring Framework includes several modules for different capabilities. One of these components is Spring Boot. Spring
Boot starters conveniently pull in all the dependencies and auto-configuration libraries required to use a particular technology. This makes it very easy to get going with a new application and technology, faster than working directly with classes like JmsTemplate. So how can we enable this easy access for MQ applications?
In this post I described how MQ’s Java classes are available for direct download from Maven Central Repository. And we have now exploited that to create a Spring Boot Starter for MQ. You can download full source code for the module from GitHub.
Getting Started with MQ Spring Boot
First of all, you need a running queue manager. Then you will create an application that accesses that queue manager.
Running a Queue Manager in a container
To get started quickly, you can use the IBM MQ for Developers container which runs the server processes. When that container runs, it creates several objects by default and those definitions are known by the auto-configuration module here. Default
values match those needed by the container’s queue manager.
This means that you can run a queue manager using that Docker environment and connect to it without further configuration. You can run the container on a Linux system with this command:
docker run
    --env LICENSE=accept --env MQ_QMGR_NAME=QM1 \
    --publish 1414:1414 \
    --publish 9443:9443 \
    --detach \
    ibmcom/mq
An example application
The approach taken here is to follow the model for JMS applications shown in the Spring Getting Started Guide for JMS. I followed the path to import that project into an Eclipse workspace and used a gradle build process, but the maven-based process works just as well. As an exercise, I used the maven configuration from the command line instead of from the Eclipse IDE.
The same application code from that example works with MQ with very little modification:
-
- Change the original messaging provider given in the dependency list to point at the IBM MQ package.
- Change the queue name in Application.java (“mailbox” is used in the example) to “DEV.QUEUE.1”, a queue predefined with the Developer configuration in the Docker container. If you are not using the Developer configuration defaults, then you will have to either set the queue name to an existing queue or define a new queue to match.
The modified build.gradle file that controls the compilation now has:
dependencies {
  compile("com.ibm.mq:mq-jms-spring-boot-starter:+")
  compile("com.fasterxml.jackson.core:jackson-databind")
}
If you prefer to use Maven, then the corresponding section in pom.xml looks like this:
<dependencies>
  <dependency>
    <groupId>com.fasterxml.jackson.core</groupId>
    <artifactId>jackson-databind</artifactId>
  </dependency>
  <dependency>
    <groupId>com.ibm.mq</groupId>
    <artifactId>mq-jms-spring-boot-starter</artifactId>
    <version>2.2.1</version>
  </dependency>
</dependencies>
The only real difference is that the Maven configuration has an explicit version number for the MQ Spring Boot module.
Default Configuration
Configuration attributes for the MQ Boot Starter are named with the prefix of “ibm.mq”. The default attributes are set to
  ibm.mq.queueManager=QM1
  ibm.mq.channel=DEV.ADMIN.SVRCONN
  ibm.mq.connName=localhost(1414)
  ibm.mq.user=admin
  ibm.mq.password=passw0rd
This matches the Docker container defaults.
Further Configuration Options
If you already have a running MQ queue manager that you want to use, then you can easily modify the default configuration to match by providing override values. The queue manager may be local or even as a hosted service in the IBM Cloud. An application.properties
file attached to the Java project is one way to externalise these attributes. The configuration takes effect without requiring any code alterations.
Specify the queue manager name with the attribute
-
- ibm.mq.queueManager
For client connections to a queue manager, you must also set
-
- ibm.mq.channel
- ibm.mq.connName
If you do not set both the channel and connName, then a local queue manager is assumed. The configuration component also supports some TLS-related attributes. These are described more fully in the README file but the default values are null.
You will probably also need to set
-
- ibm.mq.user
- ibm.mq.password
to override the default values. These attributes can be left empty to use the local OS userid with no authentication, if permitted by the queue manager.
For example in an application.properties file:
  ibm.mq.queueManager=QM1
  ibm.mq.channel=SYSTEM.DEF.SVRCONN
  ibm.mq.connName=server.example.com(1414)
  ibm.mq.user=user1
  ibm.mq.password=passw0rd
Spring Boot will then create a ConnectionFactory that can then be used to interact with your queue manager.
Testing the example program
Running the example program can be done with the gradle bootRun command. Or with maven, run mvn package followed by java -jar ./target/gs-messaging-jms.jar to execute the program. You should see output like this:
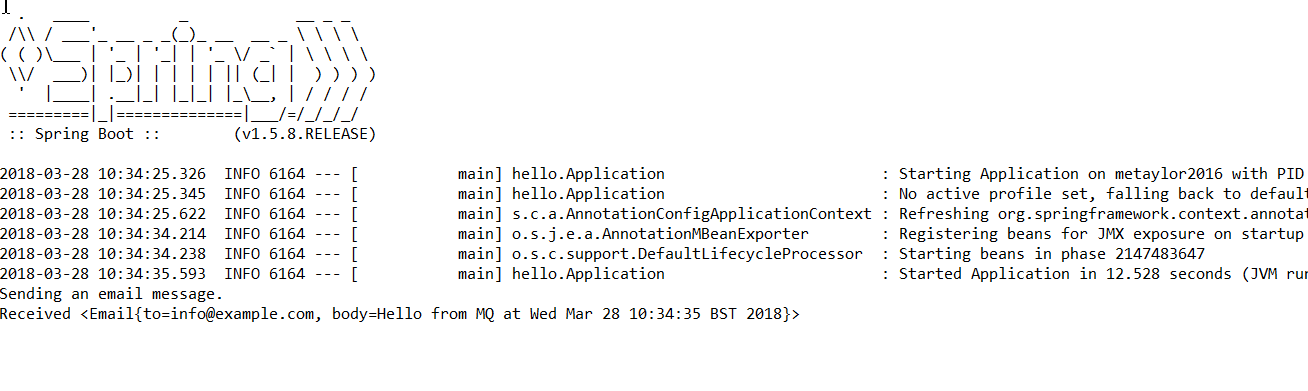
It shows how the application has put a message (“sending an email message”) and then retrieved it.
Summary
Using this Spring Boot Starter with MQ makes it very easy to get going quickly. Then after your first application is running, you can then extend it to take advantage of the many features of MQ. If you try it out, you can give feedback here or on the GitHub issues page.
Update – June 2018
Earlier this year, there was a major update to the Spring Boot Framework, known as Boot 2. The MQ boot starter has been updated to work with this new level of the framework. Of course, all publicly released levels of this code are available from the Maven Central Repository. For Spring Boot 1 compatibility, you should continue to use the 0.0.4 version of this artifact; the 2.0.0 version is Boot 2 compatible and will be used as the base for any future updates.
This post was last updated on November 20th, 2019 at 09:14 pm